
SALT: BEFORE + AFTER

We always joke that renovations are one step forward, two steps back. Unfortunately it’s less of a joke and more just the reality of renovating. If you’ve ever renovated, we’re sure this would resonate with you. It’s only upon looking back in hindsight that you truly realise how far you’ve come.
We all love a good before and after pic! It can be fun to swipe back and forth watching the transformation unfold with a simple flick, but in between that quick little flick are many (so many!!) hours of hard work, sleepless nights, long days and many months of leaning heavily on family and friends for support. We will share more about our story in the coming weeks, but for now… thank you for being here. We are humbled and grateful to share this story with you. We hope one day you can visit Salt and enjoy the spaces as we had intended.
-
Project by Greenbuild Constructions
After Photography: The Muse Collective
Before Photography: Dane Queenan Real Estate and Greenbuild Constructions in-house Architect Rizal Zaini.
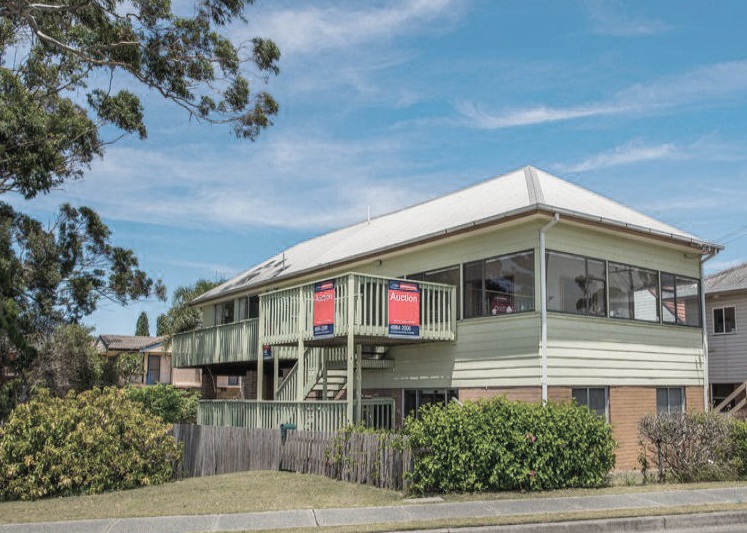
SALT: EXTERIOR - EASTERN FACADE
Being a corner block meant we needed a strong facade on both the Northern and Eastern elevations. Initially, the deck was raised up higher than the internal floor level, we didn’t feel this was necessary to capture the views and we wanted to maintain the same floor level to maximise the flow between the open plan living areas and the outdoor deck. The balustrade design was trialled three (!!) different ways by the very patient Greenbuild trades before we finally settled on this option. We took the roof off and replaced it with a new Colorbond roof in Surfmist. We replaced the aluminium windows with new timber windows, custom made by a local Hunter based joiner Watt’s Joinery and had them painted in Taubmans Cotton Sheets White. A hot outdoor shower was a must have in each space and was custom built by Bliss Kitchens & Joinery in under the Salt One deck. The house was re-clad in James Hardie Scyon Linea a fibre cement weatherboard making it a much more durable product than traditional timber weatherboards and perfect for our beachside location!

Before: Eastern exterior

After: Eastern exterior
SALT ONE: UPPER LEVEL LIVING ROOM
From the moment we saw the view of those incredible headlands, we knew this room would be our hero. We’ve always been drawn to raked ceilings and gable windows and this room was screaming for one! Our slider stacker doors were designed to open seamlessly onto the deck and were also custom made by local Hunter based joiner Watt’s Joinery.
Because the room would be so open, we decided to add some detailing to the ceiling and opted for EasyVJ lining boards by EasyCraft as they met the span required to pin the sheets all in one go, making it a much quicker process and eliminating the need for joins. We chose an engineered Oak flooring from Havwoods called Allevard Pureplank in a light colour to compliment the open and airy feeling of the room.

Before: Upper Level - Living room

After: Upper Level - Living room

Before: Upper Level - Front windows

After: Upper Level - Front Windows
SALT ONE: UPPER LEVEL VERANDAH
It’s really all about the views here. I still remember the first moment we stepped up onto this deck. It literally took our breath away. We knew we needed to maximise the amount of space out here so that guests could essentially use this space as another living area. We chose Spotted Gum hardwood timber for our deck and coated it in Cutek Clear to protect it while allowing it to silver. We wanted to create something special on the underside of the roof and opted for the James Hardie HardiGroove lining also a fibre cement sheet product. The Weber FamilyQ Built-In was the perfect size to neatly fit in the nook near the stairs.

Before: Upper Level - Verandah

After: Upper Level - Verandah
SALT ONE: UPPER LEVEL MASTER BEDROOM
We made the decision to keep the ceilings raked throughout all bedrooms. The Master bedroom was actually quite long and we knew from previous renovations that an ensuite could fit quite nicely into a 1.5m x 3m space.

Before: Upper Level - Master Bedroom

After: Upper Level - Master Bedroom & Ensuite
SALT ONE: UPPER LEVEL KITCHEN
In the end all that was kept on the second level was the floor. We kept the existing floor so the stairs and split level would stay, which would provide a higher ceiling height in the living areas below on the ground floor.

Before: Upper Level - Hallway & Kitchen

Before: Upper Level - Hallway & Kitchen
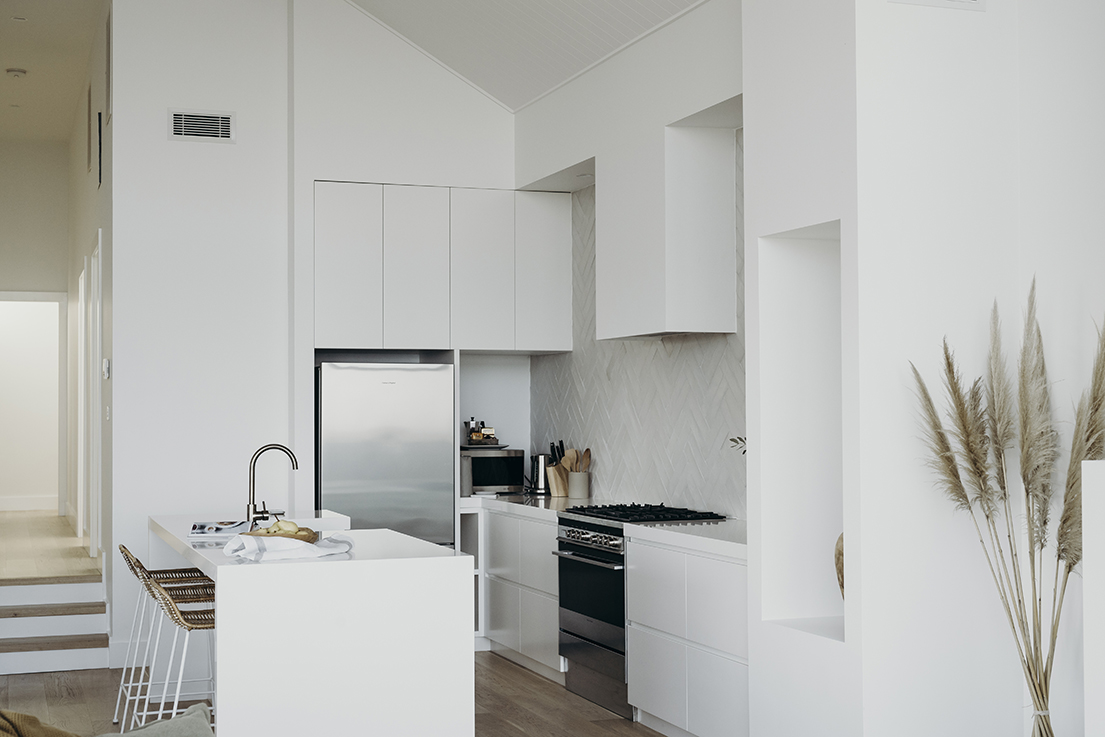
After: Upper Level - Hallway & Kitchen
SALT TWO: GROUND FLOOR BEDROOMS
The ground floor was a bit of a rabbit warren. There were a lot of walls and doors and none of the spaces flowed very well. We propped the ceiling (the second story floor) and removed all the internal walls. They were rebuilt to fit proportionally with a central hallway.

Before: Ground Floor - bedrooms

After: Ground Floor - bedrooms

After: Ground Floor - bedrooms
SALT TWO: GROUND FLOOR LIVING AREA
We decided utilise the space where the carport was and enclose the ground floor entirely. A new slab was laid where the pavers were and continued in and over the existing ground floor slab.

Before: Ground Floor - living room

After: Ground Floor - living room
SALT TWO: GROUND FLOOR KITCHEN
We were conscious that the kitchen, dining and living area on the Ground Floor was facing South and we were concerned about the amount of light we would get in this space. We decided to utilise the space under the master bedroom verandah upstairs and extend out the side and install a bank of Velux Skylights above the kitchen to help this space receive more natural light.

Before: Ground Floor - kitchen

After: Ground Floor - kitchen

After: Ground Floor - kitchen
SALT: EXTERIOR - NORTHERN FACADE
We found the fence particularly tricky. We took our inspiration from weathered coastal fences along the sand dunes and beach houses of Tasmania. We chose Spotted Gum for its low tannin leaching properties as we were conscious of the white rendered walls it would be sitting over. Just like our decks we plan to let all the timber silver off to a soft palette of greys and whites.
If you haven’t noticed by now, we are all about the details and our eave linings were no exception. We chose James Hardie Hardie Groove lining for the underside of the eaves (which you can see in the last image) to create that quintessential beach house vibe. This is also a fibre cement product making it far more durable than the typical timber lining boards and removing the risk of cracking or splitting that is typical of the timber lining boards.
Before: Northern exterior

After: Northern exterior

Before: Northern exterior

After: Northern exterior
We know first hand how difficult it can be sourcing suppliers, finding the right timber, choosing paint colours (how many different white’s can there be right?), so we will do some dedicated posts in the future to help you with all the things we wish we’d known. In the meantime, please feel free to leave your questions below and we’ll do our best to respond.
L.